Department Transfer
The Department Transfer routine allows the user to transfer Matters from one Department and/or Office to another. Matters are initially assigned to a Department when they are first established through the Maintain Matter Information routine. Departments and Offices are established and maintained through the Maintain Offices and Departments routine.
When the Firm Receipts routine is accessed from the eQuinox main menu, the screen shown below will be displayed.
Field Definition

The first two fields on this form display the Journal Type (DS) and Journal Number (1234).
Posting Date - The date on which the Department Transfers are being entered into the system. The default is the current Date, but this may be changed by making a selection from the Calendar provided or by manually entering a different date in the proper formats.
Acct Period - The Month (in number format) and Year of the Firm's current Accounting Period. This field automatically defaults to the current Accounting Period. Note: Depending on the Firm's preferences (as indicated in the Firm Parameters routine), the user may be alerted with a message when Posting the Department Transfers, and asked to verify the Accounting Period; this is used to ensure that all transactions occur within the correct Accounting Period.
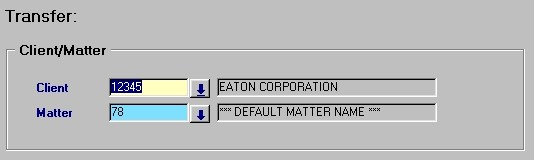
Client/Matter - In this section of the screen, the user must select or enter the Client and Matter that is being transferred from Department and/or Office to another. Note: Only the selected Matter for the current Client will be transferred. All other Matters associated with this Client will remain assigned to their original Department and/or Office.
Client - The unique identifier and name of the Client associated with the Matter that is being transferred to a different Department and/or Office. The user may either enter the Client's unique identifier (after which the Client name will automatically be displayed) or make a selection from the Look-Up form provided.
Matter - The unique identifier and name of the Matter that is being transferred to a different Department and/or Office. The user may either enter the Matter's unique identifier (after which the Matter name will automatically be displayed) or make a selection from the Look-Up form provided. The Look-Up form will display all Matters associated with the current Client.
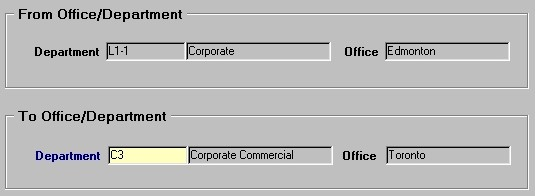
From Department/Office - This section of the screen displays the unique identifier and name of the Department and the name of the Office to which the selected Matter is currently assigned. This information is displayed automatically once the Matter has been selected, and cannot be edited by the user.
To Department/Office - In this section of the screen, the user must enter or select the Department and Office to which the current Matter will be transferred. The user may either enter the unique identifier of the Department (after which the Department and Office names will automatically be displayed) or make a selection from the List of Values provided.
After all the necessary information has been entered and/or selected, the user must click the Save button to complete the transfer process. When the information has been saved, the user will be presented with a confirmation message, stating that information was successfully posted to the GL. Note: Once the information has been saved, the new Department name will be displayed in both the From Office/Department and To Office/Department sections. When the user clicks the OK button in response to the confirmation message, the form will then clear.
Once the user has finished entering or updating information, they must click the Save button or press F10 to commit the changes to the database.